7 Best Picture Hanging Systems for Downsized Homes
Maximize your limited space with these 7 top-rated picture hanging systems. Discover versatile, damage-free solutions perfect for organizing downsized homes.
Downsizing your living space often means every square inch of wall becomes a precious gallery opportunity. Finding the right hanging system allows you to personalize your home without overwhelming your limited floor plan. These seven solutions balance aesthetic appeal with the practical reality of smaller, high-traffic living environments.
STAS Minirail: Best Low-Profile Gallery System
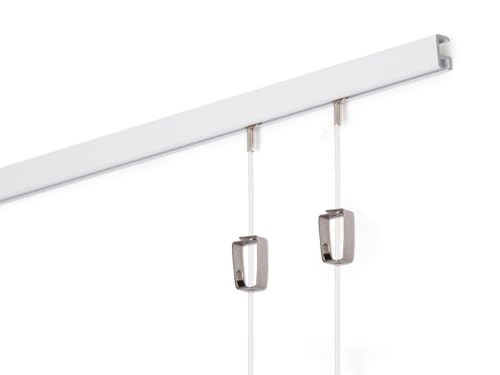
When you move into a smaller home, you want your art to pop without the hardware stealing the show. The STAS Minirail is incredibly thin, making it practically invisible once installed near your ceiling line. It’s a professional-grade choice for those who want to swap out family photos or seasonal prints without ever touching a hammer or nail again.
Because the rail is so slim, it works beautifully in apartments with lower ceilings where bulkier tracks might look cluttered. You simply slide the cords into the rail and adjust the hooks to your desired height. It’s a one-time investment that saves you from the "Swiss cheese" effect of constant wall patching.
Keep in mind that installation requires drilling, which might be a dealbreaker for some renters. However, if you are a homeowner looking for a permanent, sleek solution, the durability here is unmatched. It is the gold standard for creating a rotating gallery in a compact hallway or living area.
Command Picture Hanging Strips for Damage-Free
Easily hang large frames up to 24x36 inches and 16 lbs with Command Large Picture Hanging Strips. These versatile strips adhere securely to various smooth surfaces without damaging walls, offering a damage-free decorating solution.

If you’re living in a rental or simply hate the idea of permanent wall damage, Command strips are your best friend. These adhesive strips allow you to mount frames firmly against the wall, preventing that annoying "tilted frame" look common in high-traffic hallways. They are the ultimate solution for small spaces where you need to maximize every vertical surface.
The beauty of these strips lies in their simplicity and the ease of removal. When you decide to rearrange your layout or move to a new place, you just pull the tab and the adhesive releases cleanly. It removes the stress of trying to fill holes or matching paint colors before your security deposit inspection.
Be aware that these are not meant for very heavy, ornate frames or glass-heavy mirrors. Always check the weight limit on the packaging to avoid a midnight crash. For standard lightweight prints and small canvas pieces, they offer the best balance of convenience and reliability.
Hang It Perfect: Best All-In-One Leveling Tool
Effortlessly hang pictures with precision using the Go Hang It! Pro. This all-in-one kit features a magnetic key system for accurate nail placement and a built-in level for perfectly straight frames, all within a convenient hardware case.

We have all spent an hour holding a frame up, stepping back, and realizing it’s still crooked. The Hang It Perfect tool eliminates the guesswork by combining a level, a ruler, and a marking system into one device. It’s a lifesaver for solo dwellers who don’t have a second set of eyes to help with alignment.
This tool is particularly useful for creating perfect gallery walls where spacing between frames is critical. In a small home, a poorly aligned gallery can make a room feel cramped and chaotic. Using this tool ensures that your arrangement looks intentional and professional rather than haphazard.
While it might seem like a niche gadget, it pays for itself by preventing extra holes in your drywall. It is a practical, low-cost investment for anyone who values precision. If you struggle with the "trial and error" method of hanging art, this is your most reliable shortcut.
OOK Professional Grade Steel Picture Hangers

Sometimes, the simplest tools are the most effective. OOK hangers are a staple in my professional kit because they are incredibly strong and leave only a tiny, pin-sized hole in the wall. When you are downsizing, you want hardware that is discreet and doesn’t require a massive anchor that might crumble your drywall.
These hangers are designed to penetrate the wall at a downward angle, which provides superior grip compared to standard nails. They are perfect for hanging heavy mirrors or larger art pieces in smaller rooms where you don’t have space for floor-standing decor. They provide a secure hold without the need for bulky, visible hardware.
I always recommend keeping a variety pack on hand for different frame weights. They are inexpensive, easy to use, and hold up remarkably well over time. For the average homeowner, these offer the best "set it and forget it" reliability for everyday frames.
Monkey Hook Gorilla Grade Wall Anchor Set

If your small home has drywall, you know the frustration of anchors that spin or pull out when you hang something slightly heavy. The Monkey Hook is a brilliant, tool-free solution that uses the weight of the item itself to lock into the wall. It’s a massive time-saver for anyone who isn’t comfortable using a power drill.
These are perfect for hanging heavier items like large clocks or framed art in tighter spaces. Because they require no screws or plastic anchors, the footprint on your wall is minimal. It’s an elegant way to secure your decor without needing a full toolbox.
One thing to note is that they work best in standard drywall, so they aren’t ideal for plaster or brick walls. They are, however, incredibly sturdy for their size. If you want a quick, heavy-duty fix that won’t leave a gaping hole, this is your go-to hardware.
Gallery System Art Hanging Track for Renters
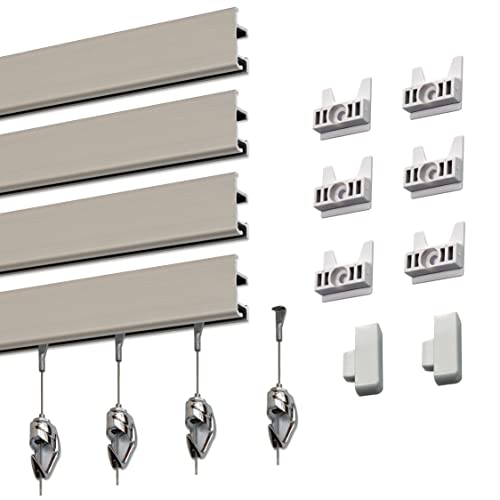
The Gallery System track is a fantastic option if you want a museum-style look but need a solution that is easy to uninstall. Unlike some permanent wall-mounted tracks, these systems are designed to be user-friendly and adaptable to various wall heights. It’s a great way to elevate the aesthetic of a small apartment without losing your deposit.
This system allows you to hang multiple pieces on a single track, which is a space-saving win for narrow gallery walls. You can adjust the height and horizontal position of your art in seconds. It’s ideal for people who love to change their decor based on the season or their current mood.
While the upfront cost is higher than a box of nails, the versatility is unmatched. You are paying for the freedom to rearrange your space as often as you like. If you treat your home as a constantly evolving space, this system is a smart long-term choice.
Hangman Products No-Stud Heavy Duty Hanger
Finding a stud in a small, crowded home can be a nightmare, especially when furniture is already in place. The Hangman No-Stud Hanger uses a clever bracket system that attaches to the wall with small, angled nails. It provides a rock-solid hold for heavy items without needing to hit a wooden stud.
This is a game-changer for mounting heavy mirrors or large canvases in awkward spots where studs are nowhere to be found. It keeps your walls clean and your heavy items secure. It’s a reliable, no-nonsense product that takes the stress out of hanging larger pieces.
Just be sure to follow the weight ratings carefully, as even the best hardware has its limits. It is a robust solution for those who want to maximize their wall space without worrying about the integrity of the drywall. For the homeowner who needs strength without the hassle, this is a top-tier choice.
How to Measure Your Walls for Gallery Layouts
Before you start hammering, take a moment to measure your wall space properly. A common mistake is hanging art too high; aim to have the center of your art at eye level, roughly 57 to 60 inches from the floor. In small rooms, this creates a sense of balance and prevents the room from feeling top-heavy.
Use painter’s tape to map out your layout on the floor before you commit to the wall. This allows you to experiment with spacing and arrangement without leaving any marks. It’s a simple trick that helps you visualize how the pieces will look together in your limited square footage.
Remember to account for the space between frames, usually two to three inches for a cohesive look. Keeping the spacing consistent is the secret to making a collection of different-sized frames look like a unified gallery. Precision in the planning stage saves you from the frustration of misaligned art.
Choosing the Right Hardware for Your Wall Type
Knowing your wall material is the most important step in choosing your hanging system. Drywall is the most common, but it can be brittle, so stick to high-quality anchors or pin-style hangers. If you have plaster walls, you’ll need a masonry bit and specialized anchors to avoid cracking the surface.
For brick or concrete walls, look for adhesive-backed mounts or track systems that can be secured with heavy-duty fasteners. Never assume a standard nail will work on anything other than wood or drywall. Using the wrong hardware can lead to damaged walls or, worse, a broken frame.
Always err on the side of caution when it comes to weight capacity. If a frame feels heavy, use two hangers instead of one to distribute the load. Taking the time to match your hardware to your wall type will ensure your home decor stays exactly where you put it.
Tips for Arranging Art in Small Floor Plans
In a small home, you want to draw the eye upward to make the space feel larger. Use a vertical arrangement to emphasize high ceilings, or a long horizontal row to make a narrow hallway feel more expansive. The goal is to create a flow that guides the eye through the room.
Don’t be afraid to mix and match frame styles, but keep the color palette or subject matter somewhat consistent to avoid visual clutter. A small space can quickly feel chaotic if there is too much going on. Use larger pieces as focal points and smaller pieces to fill in the gaps.
Finally, leave some "negative space" on your walls. Not every inch needs to be covered in art; sometimes, a clean wall provides the room with a much-needed visual break. Focus on quality over quantity to keep your home feeling curated rather than crowded.
Transforming a small home into a gallery is all about choosing the right tools for your specific wall type and lifestyle. By prioritizing damage-free or low-profile solutions, you can keep your space feeling open and adaptable. Remember that the best gallery is one that makes you happy, so take your time and enjoy the process of making your house a home.